Ohio winters are hard on roofs — and March is the month the bill comes due. Ice dams, freeze-thaw shingle separation, and hidden attic moisture don't announce themselves. This 8-point checklist walks you through every area to inspect before spring storms arrive and turn winter damage into a major leak.
Why Spring Is the Most Important Time for an Ohio Roof Inspection
Most Ohio homeowners think about their roofs in late fall, when the first hard frost is coming and there's still time to fix things before winter. That instinct is right, but spring inspection is equally critical — and arguably more urgent. The reason is compounding risk. Ohio winters deliver a specific combination of abuse: ice dam formation at the eaves, repeated freeze-thaw cycles that pry at shingle adhesive strips, and weeks-long periods of moisture saturation that weaken decking and accelerate flashing rust. All of that damage sits quietly through February and March while temperatures are still too cold for most homeowners to notice the symptoms.
Then spring arrives. Fairfield County typically sees its heaviest rainfall in April and May, with average monthly precipitation exceeding four inches during peak storm season. If your roof entered spring with compromised shingles, lifted flashing, or a saturated attic, those spring storms don't just wet things — they accelerate existing damage exponentially. A small flashing gap that survived winter without a visible drip can become a steady interior leak under the sustained rain of an April thunderstorm.
There is also a financial and legal reason to inspect in spring: Ohio homeowners insurance policies typically impose a one-year window from the date of a weather event to file a storm damage claim. If ice dam damage occurred in January and you don't discover it until July, you may already be past the filing deadline. A spring inspection keeps you inside that window and gives you time to document damage with dated photographs before filing.
Check 1: Walk Your Property and Look for Shingle Debris
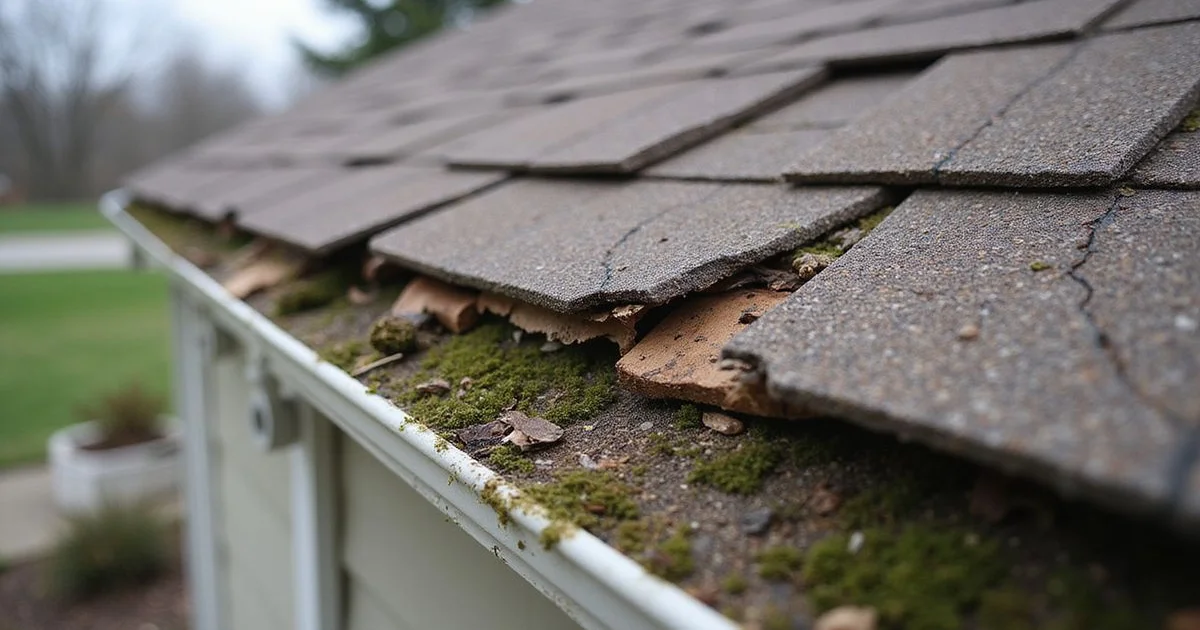
The most immediate evidence of winter roof damage is often lying on the ground or sitting in your gutters. Before you reach for binoculars or think about the attic, put on your shoes and walk a slow loop around the entire perimeter of your home.
You are looking for three things. First, actual shingle pieces on the ground — even small tab corners indicate that wind or ice has physically displaced part of the shingle surface. Second, look into your gutters from the ground and note whether you can see a gritty, sand-like accumulation. Asphalt shingles are coated in ceramic granules that protect the underlying asphalt from UV degradation; heavy granule loss in a single winter season means the shingles are past their protective prime. Third, look up at the eave line and lower roof slopes for any shingle edges that appear to be lifting away from the surface — even a slight upward curl is visible from the ground on a sunny day and indicates that the adhesive seal has failed.
Finding any of these signs from the ground is meaningful data. It tells you which side of the house took the hardest hit and where to focus your binocular inspection next.
Check 2: Inspect Gutters and Downspouts for Ice Dam Evidence
Gutters are one of the clearest indicators of how your roof handled the winter, because ice dams always leave evidence behind. When water backs up under shingles and refreezes at the eave, the expanding ice exerts significant outward pressure on the gutter itself. After the ice melts, you are left with a record of what happened.
Walk the gutter line and look for sections that have bent outward, pulled away from the fascia board, or are sagging between hangers. These are mechanical signs that ice dam weight exceeded what the gutter system was designed to hold. Check the fascia board directly above the gutter for paint peeling or brown water staining — this indicates that meltwater worked its way behind the gutter and soaked into the wood.
At each downspout, check whether the connection to the gutter is still intact or has separated. Winter ice expansion frequently cracks the outlet fitting or disconnects the elbow joint at the base. Also check downspout discharge areas on the ground for heavier-than-usual granule deposits — granules that shed from shingles during winter wash through the gutters and collect here. A significant pile of gray or black grit at a downspout exit tells you the shingles above that section are compromised. For a deeper look at how gutter failures escalate into roof damage, see our guide on 5 Gutter Problems That Can Destroy Your Roof.
Check 3: Check Eaves and Fascia for Ice Dam Staining
Ice dam damage doesn't always make it into the visible interior of your home. Often it stops just short — soaking into the eave structure and the fascia board before evaporating over weeks. That means the damage happened, and it's there, but it hasn't dripped on your ceiling yet. Spring is the time to find it before the next round of rain reopens those pathways.
Stand at each corner of the house and look along the eave line at a low angle. Paint that is peeling or bubbling on the fascia board is a clear sign of sustained moisture contact. Wood that appears darker in color than surrounding sections, or that has a soft or spongy look under the paint, has absorbed water. In cases where ice dam intrusion was significant, you may see a waterline stain — a horizontal discoloration mark — on the vertical face of the fascia that traces exactly how high the backed-up ice sat.
The key distinction to make is between historic staining (old, dry, faded, with no soft wood) and active damage (soft wood fiber, fresh discoloration, paint that is still lifting). Historic staining means the problem occurred in a prior season and the area dried out; it may still need attention but is not an emergency. Active damage means moisture is still present or recently departed, and the underlying wood structure needs to be assessed before the spring rain season begins.
Check 4: Examine Shingles with Binoculars
A good pair of 8x or 10x binoculars turns a ground-level observer into someone who can read the surface of a roof as clearly as if they were standing on it. This is the safest way for a homeowner to do a detailed shingle inspection, and it's the method we recommend as a first step before calling a professional.
Work systematically, slope by slope. Start with the north-facing slope, because this side receives the least direct sunlight, dries out the slowest after rain and snow, and is most prone to moss and lichen growth as well as prolonged freeze-thaw stress. Then examine roof valleys — the angled channels where two roof planes meet — because water concentrates here and shingle wear is accelerated.
You are looking for five specific conditions. Cracking is a clean fracture across the body of the shingle, usually running parallel to the tabs. Cupping occurs when the shingle edges turn upward while the center sinks, indicating moisture cycling and age. Missing tabs are obvious voids in the shingle field where a tab corner or full tab has blown away. Bare patches appear as darker, smoother areas where granules have fully shed and the black asphalt substrate is exposed. Lifted edges are shingle corners that have lost their adhesive bond and are sticking up, making them vulnerable to wind intrusion. Any combination of two or more of these conditions on a significant portion of a slope is grounds for a professional inspection call.
Check 5: Inspect All Roof Flashing
Flashing is the sheet metal used to seal transitions between the roofing surface and penetrations or adjoining structures — chimneys, skylights, dormers, and roof-to-wall joints. It is the most common single point of failure on roofs that are otherwise in decent condition, and Ohio winters are particularly hard on it.
The freeze-thaw cycle causes both the metal flashing and the roofing materials it contacts to expand and contract at slightly different rates. Over many cycles, this differential movement works the flashing loose from its sealant bed or pulls it away from the surface it is pressed against. From the ground with binoculars, look for flashing that has a visible gap between it and the chimney masonry, any rust staining on the metal surface or streaking down the shingles below, and step flashing along dormers or walls that appears to be lifting away from the vertical surface. Even a gap of an eighth of an inch at a chimney base flashing is enough to allow significant water intrusion during a driving rain. For flashing repair options, see our roof repair services.
Check 6: Check Pipe Boot Flashings Specifically
Pipe boot flashings deserve their own checklist item because they are the single most common source of roof leaks in Ohio and across the Midwest, and they are almost always ignored during casual inspections. Every plumbing vent stack that exits through your roof has a rubber boot collar that seals the gap between the pipe and the surrounding shingles. These boots are made of EPDM rubber or a neoprene compound, and they have a specific service life — typically 10 to 15 years — that is shorter than the roof surrounding them.
Ohio's temperature swings are brutal on rubber. Summer heat bakes the material, making it stiff and brittle. Winter cold causes it to contract and crack. After several cycles, the collar develops radial cracks at the top of the pipe collar opening — exactly where water pools. From the ground with binoculars, you can often see a cracked or deformed boot by looking for a visible gap or split at the top of the pipe-to-boot interface, or by noticing that the boot has shrunk away from the pipe rather than maintaining tight contact.
The repair cost for a pipe boot is modest — typically $150 to $350 for a professional replacement — and it can be done without a full roof tear-off. Left unaddressed, a failed pipe boot will allow water to run down the pipe and pool on the attic floor or ceiling deck directly below, causing wood rot, insulation damage, and eventually drywall staining in the living space. It is one of the highest return-on-investment repairs available on an aging roof.
Check 7: Head Into the Attic
No spring inspection is complete without a visit to the attic. This is where winter damage that didn't make it to the living space gets stored, and it is often the earliest indicator of active problems that will worsen in spring.
The first test is the daylight test. On a bright afternoon, enter the attic and turn off all lights, including your phone flashlight. Give your eyes a moment to adjust, then look at the underside of the roof deck. Any points of light indicate gaps or holes in the deck — entry points for water, insects, and cold air. Pay particular attention to the areas around pipe penetrations, the ridge line, and the eave edges where ice dam pressure is concentrated.
Next, examine the underside of the roof deck and the rafters for water staining. Fresh stains will appear darker and may still feel slightly damp; older stains will be gray or brown with dry edges. Compare what you see now to your memory of the attic last fall — any new staining that wasn't there in October is winter damage. Check insulation batts near the eaves for compression or wet spots, since saturated insulation in that area is direct evidence of ice dam intrusion. Finally, take a breath. A musty or mildewy smell that wasn't present in fall indicates that moisture has been present long enough to begin mold or mildew growth. For a full discussion of how ventilation problems contribute to these conditions, see our article on Ohio's most overlooked roof ventilation problems.
Check 8: Inspect the Ridge Line from Multiple Angles
The ridge line — the peak where two roof slopes meet — is both the highest point on the roof and one of the most structurally telling. Viewing it carefully from multiple vantage points around your property takes only a few minutes and can reveal problems that no amount of shingle inspection will show you.
From the front and back of the house, sight along the ridge as if you were looking down a pool cue. A healthy ridge line runs dead straight from one end of the house to the other. A ridge that sags or dips in the middle, even by two or three inches, indicates that the structural ridge board or ridge beam beneath has weakened — most commonly from moisture damage to the supporting framing. This is not a repair you defer; a sagging ridge is a structural issue that needs professional assessment before the next significant snow load or wind event.
From the side of the house, look at the ridge cap shingles — the row of shingles that straddles the peak. These are particularly vulnerable to wind damage because they are on the highest, most exposed part of the roof and are nailed in a direction that makes them susceptible to uplift. Missing ridge cap shingles expose the open ridge joint to direct rain entry and should be replaced as soon as identified. Displaced ridge caps that have slid sideways or been lifted to one side also need immediate attention, as the fastener holes they once covered are now exposed.
When Your Spring Inspection Should Lead to a Professional Call
A ground-level homeowner inspection is valuable, but it has real limits. There are specific findings that should trigger a call to a licensed roofing contractor rather than a note on a to-do list.
Call a professional if you find any evidence of ridge sag or structural displacement. Call if your attic inspection reveals new water staining, active moisture, or any sign of mold growth. Call if you find multiple damaged shingles across more than one slope, or if you can't clearly identify what you're seeing from the ground and want certainty. Call if your roof is over 15 years old and you haven't had a professional inspection in the past three years.
Many licensed roofing contractors, including our team, offer free spring inspections. A professional can access the roof safely, inspect flashing up close, probe soft spots in the decking, and give you a written assessment of the roof's condition. If you're on the fence, the cost of a free inspection is always lower than the cost of discovering a problem six months too late. To understand what a professional inspection involves, read our guide on what to expect during a professional roof inspection.
Spring Inspection vs. Fall Inspection: What's Different
Ohio homeowners who inspect their roofs annually often ask whether they need both a spring and a fall inspection. The answer is yes — and the reason is that the two inspections look for fundamentally different things.
A fall inspection is forward-looking. Its purpose is to identify and correct vulnerabilities before the next winter arrives. You are checking for shingles that won't survive another freeze-thaw season, cleaning gutters to prevent ice dam formation, ensuring pipe boots and flashing are adequately sealed, and confirming that attic ventilation is functioning correctly so that warm air doesn't build up and accelerate ice dam formation. Fall is the time to fix things before they become winter problems.
A spring inspection is backward-looking. Its purpose is to assess what the just-completed winter actually did to your roof and find damage before the spring storm season amplifies it. You are looking for evidence of ice dam water intrusion, shingle separation caused by freeze-thaw cycling, rust and movement in flashing that expanded and contracted for four months, and attic moisture that built up when ventilation couldn't keep up with temperature extremes. Spring is the time to find the damage that was done and repair it before the next risk season — summer thunderstorm season in Ohio — begins. Both inspections are necessary, and neither substitutes for the other.
Next Steps After Your Spring Inspection
When you have completed your walk-through, start a simple documentation file. Use your phone to take dated photos of everything you found — granules in gutters, any lifted shingles, staining on fascia, anything in the attic. The date stamp on those photos is important: it establishes when you discovered the condition, which matters for insurance claim timelines.
If you found nothing of concern, note that too. A written record that your roof passed a spring inspection in March 2026 is useful context if something develops later in the year.
If you found red flags — active attic moisture, multiple shingle issues, flashing problems, or a sagging ridge — do not wait until summer to address them. Spring in Ohio is a narrow window between the freeze-thaw damage of winter and the driving rain and hail of June and July. Repairs scheduled in April are completed before the summer storm season opens; repairs deferred to July are playing defense against an active threat.
Contact our team to schedule a spring inspection or get a written estimate on any repairs your inspection uncovered. We serve Lancaster, Fairfield County, and the surrounding Ohio communities, and we provide honest, itemized assessments so you understand exactly what your roof needs and why.
Need Help with Your Roof?
Get an inspection and estimate from Lancaster's most trusted roofing team.